Free Northern Diamond Square Crochet Pattern for Beginners
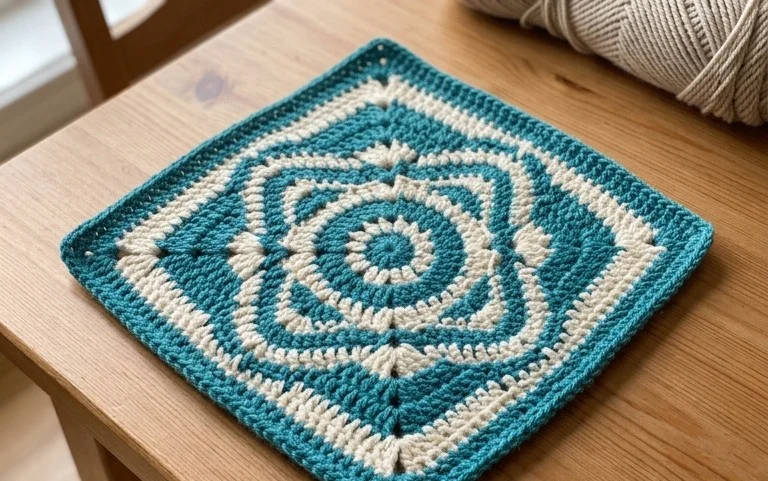
Soft to the touch and geometric in design, the Northern Diamond Square feels substantial yet flexible, making it a reliable choice for everything from kitchen coasters to heavy winter blankets. This pattern suits makers who enjoy a steady rhythm, as the structure builds upon basic stitches that form a clear diamond motif as you work outward. You will master the technique of managing chain spaces to create defined edges, which helps keep your geometry consistent. Whether you are using up a bin of spare yarn or planning a color-blocked throw, this project offers a meditative pace that rewards your focus with a durable, textured result.
Why You’ll Love This Pattern
The Classic Crochet Granny Square is the building block of textile arts, offering a rhythmic, meditative experience that turns small amounts of scrap yarn into functional art. This project relies on a repetitive sequence that becomes muscle memory within the first two rounds, making it ideal for crocheting while listening to podcasts or watching television. Because it works in distinct rounds, you can easily pause your progress at the end of any sequence without losing your place. Beginners appreciate this pattern because it introduces the concept of working into chain spaces rather than individual stitches, which significantly speeds up the process and builds confidence. The modular nature of these squares means you can create a single coaster or keep adding rounds to produce a large afghan, providing complete control over the final project scale.
I started this project to use up my leftover acrylic yarn and found the process incredibly soothing. The instructions are clear enough that I finished my first square in twenty minutes and felt confident enough to start a second one immediately.
— Sarah, hobbyist maker
Pattern Overview & Skill Level
- Skill Level: Beginner
- Approximate Time: 30 minutes per 6-inch square
- Construction: Working in joined rounds from the center outward
- Finished Dimensions: Approximately 6 inches by 6 inches using standard worsted weight yarn
Materials & Supplies Needed
- Yarn: Worsted #4 weight, acrylic or wool blend, approximately 25 yards per square.
- Hook Size: 5.0 mm (H-8).
- Notions: Tapestry needle for weaving in ends, scissors, and a measuring tape.
- Yarn Substitutions: You can use DK weight yarn with a 4.0 mm hook for a smaller, tighter square, or bulky weight yarn with a 6.0 mm hook for a faster, larger result.
Stitch Guide & Abbreviations (US Terms)
- ch = chain
- sl st = slip stitch
- dc = double crochet
- dc cluster = 3 double crochet stitches worked into the same space
- sp = space (the hole created by the chain stitches in the previous round)
- st = stitch
Step-by-Step Pattern Instructions
Foundation and Rounds
- Start: Ch 4, sl st to the first chain to form a ring.
- Rnd 1: Ch 3 (counts as first dc), work 2 dc into the ring. Ch 2, work 3 dc into the ring, ch 2, work 3 dc into the ring, ch 2, work 3 dc into the ring, ch 2. Sl st to the top of the starting ch-3. (12 dc total, 4 ch-2 spaces)
- Rnd 2: Sl st into the next dc and into the first ch-2 space. Ch 3, 2 dc into the same space, ch 2, 3 dc in the same space (first corner made). Ch 1, move to next ch-2 space, work 3 dc, ch 2, 3 dc in same space. Repeat from * to * two more times. Ch 1, sl st to top of starting ch-3. (24 dc total)
- Rnd 3: Sl st to the next ch-2 space. Ch 3, 2 dc in same space, ch 2, 3 dc in same space. Ch 1, work 3 dc in the next ch-1 space. In the next ch-2 corner space, work 3 dc, ch 2, 3 dc. Ch 1, work 3 dc in the next ch-1 space. Repeat from * to * two more times. Ch 1, sl st to top of starting ch-3. (36 dc total)
- Rnd 4: Continue the established pattern. Work 3 dc, ch 2, 3 dc in each corner ch-2 space. Work 3 dc in each ch-1 space along the sides. Join with a sl st to the top of the starting ch-3. (48 dc total)
Finishing
Once you reach your desired size, fasten off your yarn, leaving a 6-inch tail. Use a tapestry needle to weave the end through the back of the stitches to secure the yarn. If you are making multiple squares to join, leave a longer tail on one square to assist with the mattress stitch seaming process later.
Care & Washing Instructions
- Hand wash in cool water with a mild detergent to prevent fiber pilling.
- Lay the square flat on a clean towel to air dry, reshaping it into a perfect square while damp.
- If using wool, avoid high heat in the dryer, as it will cause the square to shrink or felt.
Pro Tips & Common Mistakes to Avoid
- Maintain consistent tension by ensuring your fingers are positioned comfortably on the hook handle; tight tension will make it difficult to insert the hook into the chain spaces.
- Always place a stitch marker in the first chain of the round if you have trouble identifying the starting point for the final slip stitch.
- Weave in your ends as you go, rather than waiting until you have ten squares finished, to make the finishing process less daunting.
- If you want to adjust the size, simply repeat the pattern of working 3 dc into each side space and the corner increases until you hit your target dimensions; note that increasing the size will require more yardage per square.
Frequently Asked Questions
Can I use different yarn weights in the same blanket?
While you can combine weights, it will result in uneven squares and puckering. For the best result, stick to one yarn weight per project.
Is this pattern suitable for making a sweater?
This pattern is designed for flat items. While you can join squares to create a garment, you will need to block the individual pieces to ensure the final fit matches your body measurements.
How do I know if my tension is correct?
Your square should lay flat on a table without curling. If it curls into a bowl shape, your tension is too tight; if it ruffles, your tension is too loose.
May I sell the items I create using this pattern?
Most individual designers permit the sale of finished items made from their patterns. Check the specific terms provided by the pattern source or author for full commercial usage details.
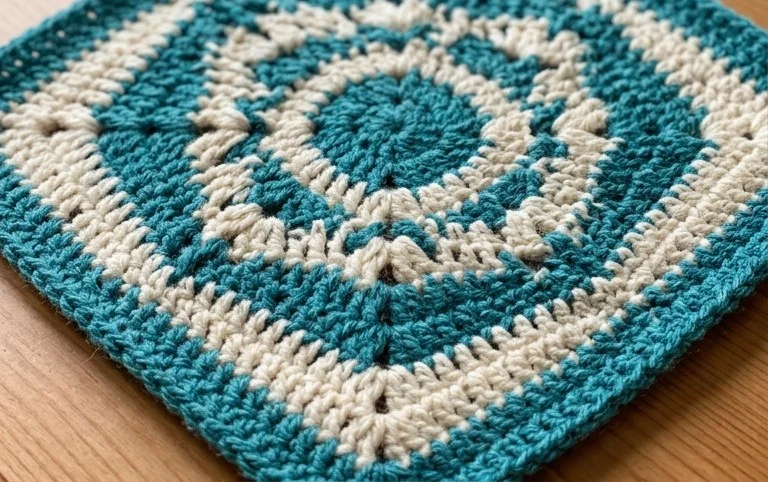
Seeing your finished square with its crisp diamond center is deeply satisfying after just a half hour of focused work. You can change the final look entirely by swapping a solid acrylic for a variegated wool or by adding a round of dark contrasting yarn to make the white lines pop even more. Share a photo of your progress online to show off your tension and unique color choices. Browse our library for more patterns to build your skills and fill your home with handmade pieces.